| FreeVR: Virtual Reality Integration Library |
|
FreeVR: Application Development Guide(ie. Programmer's Guide)February 29, 2024 for FreeVR Version 0.7eWritten by Bill Sherman IntroductionThis guide is for assisting the development of applications designed to be compiled with the FreeVR library. It explains the basic organization of creating a VR application using FreeVR. A FreeVR Function Reference is available that lists all the functions that one might use in programming a FreeVR application. One major caveat: this guide is not yet complete. It will certainly help to get one started down the path, and combined with the function reference and the tutorials, there should be sufficient documentation to write interesting virtual reality applications.
This document does not explain how to compile the library itself, administer the library, or use applications developed with FreeVR. For these subjects, see one of the companion guides:
What the FreeVR library does for the application programmerThe primary purposes of the FreeVR library is to handle all the hardware interfacing and allow any virtual reality application to run on any hardware configuration. Other benefits provided by the library are the automatic use of multi-processing to make applications run as effectively as possible, and the ability to map actual hardware devices to logical devices so the user can interact with the application in the most convenient way possible given particular hardware availability. A FreeVR application is configured at run-time, so the user (or VR lab administrator) can choose how to run a particular application by modifying a configuration file, without changing or recompiling the application itself. Configuration information is discussed in the Administrator Guide. (Conditional statements in the configuration file can affect how an application starts based on: user, hostname, time-of-day, or any environment variable setting.)
What a FreeVR application doesThe FreeVR library handles all of the interfacing with VR hardware input and output. This allows the VR application programmer to focus on how to render the virtual world, and to affect the simulation based on user inputs.
What the application does is divided into world rendering and
world simulating. These two sides are handled independently
to allow the world to be rendered as rapidly as possible even
when the world simulation calculations might become slower.
Therefore it is prudent to ensure each aspect be handled
independently.
In FreeVR, the rendering is assigned as a callback function that
the FreeVR system will then call for each viewpoint.
The world simulation is handled in the main flow of the application,
typically in a loop that scans for termination conditions.
Other processes, such as inputs, are handled exclusively by the
FreeVR system, with functions that can be called to query the
state of the VR system.
Types of Input
FreeVR currently handles five different types of input:
Binary switches are simply buttons and switches that can be on or off. Examples from a typical desktop include the buttons of a mouse, and the keys on a keyboard. A common example in a VR facility include the buttons on a wand. Binary inputs are typically used to signal a discrete event. For example grabbing an object, or indicating a menu selection. FreeVR binary inputs give an integer value of zero or one (of course). Valuators are inputs that provide a value from a continuous range of numbers. On a desktop computer system, a valuator might be the percentage of the cursor's vertical height on the screen, a dial that can be twisted, or an axis of an analog joystick. A common VR valuator is a joystick held by the user. Both axes of a desktop or wand joystick are simply treated as two separate valuators. Valuators are used to indicate the amount of something. For example, how fast to travel forward, or rotate the world. In FreeVR, most valuators are scaled to fill the range [-1.0, 1.0]. Some, such as triggers, may only use the range [0.0, 1.0]. Six-DOF sensors ("6-sensors") are inputs used to track an object or part of the participant in a VR display. (DOF is short for "degree of freedom.") In a VR system, the six degrees of freedom are X, Y and Z translational movement from the origin (the location), and the X, Y and Z rotational offsets from the origin's defined coordinate system (the orientation). The combined location and orientation can be referred to as the overall position. NOTE: not in this documentation, but in other circumstances, the term "position" is sometimes used to mean just location or just orientation. Here, "position" will be used to refer to the combined location and orientation of a sensor. Position sensing devices are typically hardware devices specifically designed for VR systems. Common devices that the FreeVR library interfaces with are the ART Dtrack systems, InterSense IS-900 units, and Ascension Flock of Birds. There are many other 6-DOF hardware input devices that FreeVR has been programmed to interface with. Such 6-DOF input hardware is often referred to as "position trackers" or sometimes just "trackers". There are also desktop devices that can provide 6-DOF inputs. Two examples are the Magellan SpaceMouse and the Spaceball. These devices give relative values, so interface code in the library can be used to "fly virtual sensors around the simulated world." Six-DOF sensors are used to indicate the position of an object in the real world. For example the location of the CAVE wand, and the direction it is pointing. FreeVR uses 4x4 homogeneous matrices to store and manipulate 6-sensors. There are functions that can extract useful values from the matrix. Documenting the usage of an input
FreeVR provides the means for the application programmer to
"self-document" the user-interface of their application.
In fact, the result is more akin to a quick-reference guide
to using the application, but it can be quite useful.
This "self-documentation" works by providing a short string that
describes each of the inputs used by the application.
When the program is running, the user can press the "9/PageUp"
key on the numeric keypad to toggle the display of
the quick-reference guide.
The five functions for describing particular inputs are:
There are also two functions for adding information about the application that will be included in the quick-reference display (which are not directly related to inputs, but are worth noting here). These two functions allow the application programmer(s) to specify a title/name of their application, and also to give themselves and their collaborators authorial credit for the application. Two additional functions to provide helpful information to a user of an application allow for any "extra" information the authors deem important, and one to indicate the status of the application. These four functions are simply:
Requesting the value of an inputThere are many options to choose from when retrieving an input value. One can request the current value, or the difference in the value since the last request. One can specify the input numerically (ie. "button-1" "button-2", etc) or directly (with a pointer to the input structure). Six-sensors also allow one to choose which coordinate system the values should be reported in. The three most common functions for obtaining input values are:
These functions can return results in one of two coordinate systems (see the next section): the real world's or the virtual world's. When requesting values relative to the virtual world, it is necessary to specify a user number, because if there are multiple users, they are each allowed to have their own virtual world coordinate system. If the application is designed for only one user, then it is reasonable to use 0 (zero) as the user number.
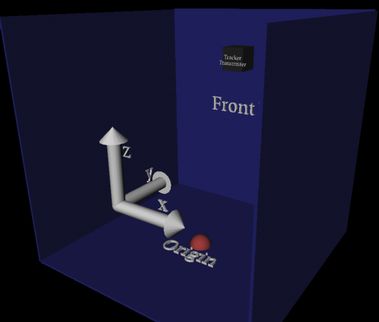
Coordinate SystemsA VR setup will have an arbitrarily assigned origin that is used to specify the offset of the output displays (e.g. screens) and the input position trackers such that they can be referenced in a single coordinate system. Because this origin is assigned a position in the real world, we refer to this as the real-world coordinate system (RW). In FreeVR, when an application begins, the origin of the virtual world will match that of the real world. However, there are functions available to offset the virtual world from the real world, thus allowing the user to move to another place in the virtual world without physically moving. The standard FreeVR coordinate system is based on the OpenGL standard. As the user looks into the world in some arbitrarily defined primary viewing direction (e.g. the front wall of a CAVE), the X dimension is to the right, the Y dimension is up, and the Z dimension comes out at the viewer. The origin is also arbitrary, but the de facto standard in CAVE systems is to place the origin in the center of the floor (ie. about where the user's feet will be when the application begins). Note: Some CAVE systems are configured with the origin centered vertically as well as on the horizontal plane.
FreeVR can also be used with graphics libraries other then OpenGL. Some of these libraries use a different coordinate system. Performer is one current example of this. Performer was designed primarily with the flight simulation community in mind, and that community treats the ground terrain as the X/Y plane. Thus, Performer's coordinate system is basically a rotation from the OpenGL CS of 90 degrees around the X-axis. The Z dimension is now up, the Y axis points into the front screen, and X remains the same.
The standard FreeVR 6-sensor routines return information in the OpenGL-based coordinate system. When working in Performer, the returned values can be converted to the Performer system with a conversion function. Virtual World Coordinate SystemThe coordinate system in which all the virtual objects in the virtual world are defined relative to is the virtual-world coordinate system(VW). FreeVR provides a suite of functions that can offset and reorient the virtual world from the real world. Because this offset is a good means of allowing the participant to move through the virtual world, these functions are referred to as the "UserTravel" functions. The FreeVR input system allows the position of 6-sensors to be reported either in the RW or VW coordinate system. FreeVR provides the option of multiple users each having their own relative VW position, so a user number must be specified when requesting a VW position. Applications can operate on the assumption that all users travel together by using the "VR_ALLUSERS" value when modifying the virtual world coordinate system, and using user-0 when requesting a VW value.
Programming in FreeVRSeveral example programs are provided in the Tutorials Manuals with a fairly comprehensive Functions Reference Guide. Compiling a FreeVR applicationFreeVR provides a standard header file that includes all the type definitions and function declarations needed by the FreeVR programmer — freevr.h. An OpenGL application with the FreeVR library requires the OpenGL library (-lGL), The standard and input X11 windows libraries (-lX11 -lXi), and the standard Unix math library (-lm). So, a typical link line for FreeVR will include: -lfreevr -lGL -lX11 -lXi -lmOn Linux systems, the location of the X11 libraries must often be specified, and the dynamic loading routines require the addition of another library (-ldl). Linux: -L/usr/X11R6/lib -lX1 -lm -ldl -lfreevr -lGL -X11 Beginning with version 0.5e, FreeVR has been adapted to compile appropriately on both 64bit and 32bit operating systems. When a particular type is specified (since it is possible to compile a 32bit version on 64bit hardware), the name of the library typically has the string "_32" or "_64" appended to the library file name. Thus, on a Linux system (for example), one might now use: Linux: -L/usr/X11R6/lib -lX1 -lm -ldl -lfreevr_64 -lGL -X11 Also beginning with version 0.5e, there is a compile-time pthreads option for FreeVR which replaces the forking mode of multi-processing with pthreads. Compiling the FreeVR library with the pthreads option produces a separate (and distinctly named) version of the library — typically ending in "pt". So we might now have: Linux: -L/usr/X11R6/lib -lX1 -lm -ldl -lfreevr_64pt -lGL -X11The biggest difference in using the pthread version versus the traditional forking version is the fact that global variables in the pthread version will now be accessible in all of the threads. NOTE: the use of such global variables can have a tendency to poorer programming technique, so the use of the pthread specific library is discouraged except in cases where it is absolutely necessary — ie. not just the result of programmer laziness. Example Code
Many examples of FreeVR OpenGL programs can be found in the
FreeVR Tutorials package.
FreeVR keeps track of many timing statistics as an application is running. For the typical user, there may be some interest in the overall frame rate of the system (which is available), but for the power-user, and especially for the efficiency-minded application programmer, a detailed statistical display is available.
For the basic user, the display of the frame rate (aka FPS — frames per second)
can be displayed for any rendering window by pressing the "*" key on
the numeric keypad.
The FPS display will appear on whichever FreeVR window currently has the
system input focus.
The location, color, and whether the display will initially appear in a window,
are all values that can be set within the
FreeVR configuration file.
Some of these values can also be adjusted while the application is running
through the socket interface controls.
During program development, application programmers can benefit from the use of the more advanced statistics display available through the standard FreeVR library. As with the "FPS" information, particulars about the statistics, can be controlled both by the FreeVR configuration file, and the socket interface controls. These control options will also be described here.
For the full statistics, the "Decimal" / "Delete" key on the numeric keypad
toggles the statistics display for the window with keyboard input focus.
Independent statistics are kept for each of the processes of a FreeVR system. These processes typically include one for each of the windows, one for all of the inputs, and one for the world simulation. Thus for each process, the configuration can specify separate controls of how the statistics will be measured and/or displayed. One thing that is not controlled within the process' own configuration is on which window its data will appear. This information is configured on a window by window basis.
By default, each window will be responsible for displaying the
rendering statistics associated with its own process.
However, there is no direct correlation between process and
window for either the input or simulation processes.
Therefore, the ability to control this is part of the system
configuration process.
NOTE: for the default "simulator" system, the input and simulation
processes are displayed on the single simulator rendering window.
Each of the three categories of process (input, simulation, visual-renderer) has separate categories for separating the sub-timings of the process. For the input process the categories are simply a listing of all the input-devices handled by that process, plus the time spent sleeping between loops. For the simulation process (aka the "main process"), the categories are:
Without the separate categories for dividing the simulation time, it would be difficult for the application programmer to actually determine in which part of their code the application is responsible for consuming a disproportionate amount of time. For example, the programmer may want to know how much of the simulation is spent in one particular routine within the simulation, so they can bracket this part of the code with calls to vrSystemSimCategory() to learn the relative amounts of time inside and outside of this section of their code. Or, another example might be to bracket all the calls to FreeVR's locking routines to determine how much time is spent blocked within the locks. The "paused" time is controlled by the user during runtime, by pressing the "Pause"/"Break" key on the keypad, FreeVR will stop the advance of time, but rendering will continue. The time spent "sleeping" is the result of a configurable option for each process that allows the VR administrator to set the minimum amount of time spent in each "frame" of the given process. Typically this minimum time is set to 0ms, in which case no time will be spent "sleeping". For the rendering process, the categories are:
TODO: describe the system configuration options for statistics - window object: - "statsProcs" -- a list of processes whose stats should be shown on this window (including a special "self" argument) - "showStats" -- boolean to indicate whether stats display is on at startup [NOTE: currently being set to 1 by default, but really should be 0] - process object: - "stats" options: - "label" (string) - "calc" (bool) -- whether to calculate statistics for each frame (can be used to sort-of "pause" the stats display) - "show" (bool) -- whether to show this particular process' stats - "mask" (integer) -- a bitmask of which stats values to show - "xloc" (float) - "yloc" (float) - "width" (float) - "top" (float) - "interval" (float) - "scale" (float) - "bg" (4 float-list) TODO: describe the runtime options for statistics
	- hitting the "DEL"/"." key on the numeric keypad will toggle
		a configured window's stats display

	- telnet controls:
		- "window[<num>] stats {0,1}" -- turn off/on a window's stats display.
		- "proc[<num>] stats_calc <v1>" -- set the flag of whether to calculate stats
		- "proc[<num>] stats_show <v1>" -- set the flag of whether to show these stats
		- "proc[<num>] stats_mask <v1>" -- set the mask of which statistics to show
		- "proc[<num>] stats_xloc <v1>" -- set the x location of where to put stats
		- "proc[<num>] stats_yloc <v1>" -- set the y location of where to put stats
		- "proc[<num>] stats_width <v1>" -- set the width of the stats display
		- "proc[<num>] stats_top <v1>" -- set the top timeline of the stats display
		- "proc[<num>] stats_interval <v1>" -- set the horizontal time intervals of the stats display
		- "proc[<num>] stats_scale <v1>" -- set the vertical scale of the stats display
		- "proc[<num>] stats_color <v1>,<v2>,<v3>" -- set the background color of the stats display
		- "proc[<num>] stats_opac <v1>" -- set the background opacity of the stats display

		[the only thing that can't really be done by telnet
		is set which processes will be shown on a particular
		window.]
© Copyright William R. Sherman, 2024. |